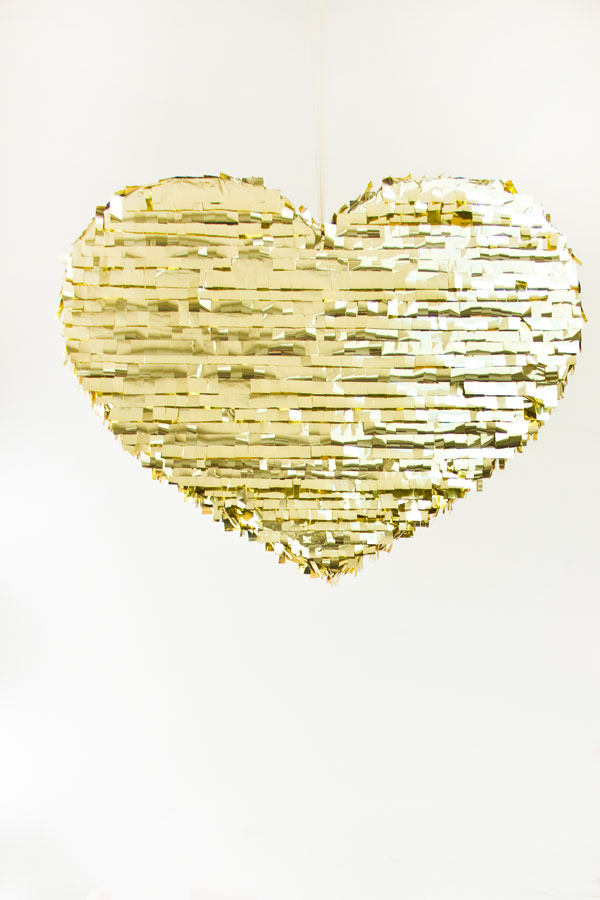
It’s finally here! You caught a little glimpse of this giant shiny heart piñata in my first post for The Sweetest Occasion, and now I’m here to share the full tutorial! I am seriously obsessed with this thing. Like, I want to hang it permanently in my home, and I’m well on my way to convincing Jeff that that is perfectly acceptable. Now, in an effort of full disclosure, this piñata is not the easiest thing to create. Mylar is much tougher to work with than typical crepe paper. But let me tell you, if you can amp up that patience meter for the sake of shiney awesomeness, it is well worth it!

I mean seriously!? I don’t know if life gets any better than a giant heart shaped piñata. That also happens to be gold.
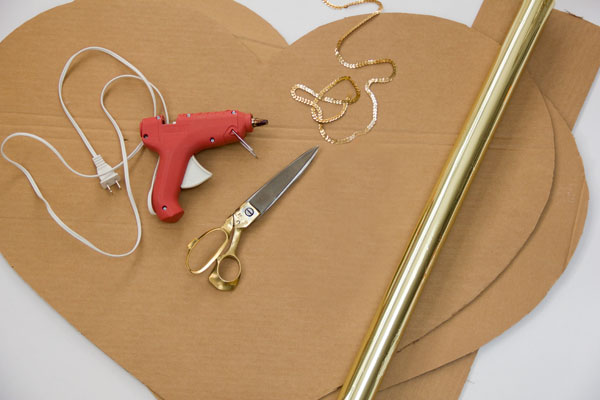
Large Cardboard Box (If you don’t want to buy one, go to your local independent mail shop, they often have some laying around that they’ll give you!)
Scissors
Hot glue Gun
Gold Mylar (You will need enough for approximately 85 30″ x 1.5″ strips for a piñata this size, see below, and I recommend ordering the roll for easier cutting!)
X-Acto Knife
Long Ruler or Yard Stick
Tape (Just plain old tape, not double stick and do not use glue. I learned this the hard way.)
Awl
Ribbon, sequin trim or something stronger to hang it with like a straightened wire hanger
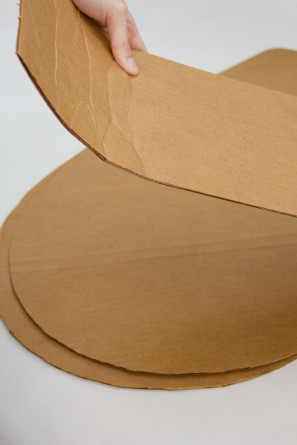
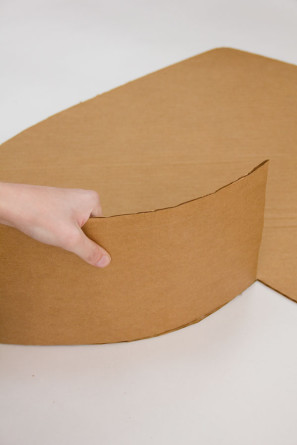
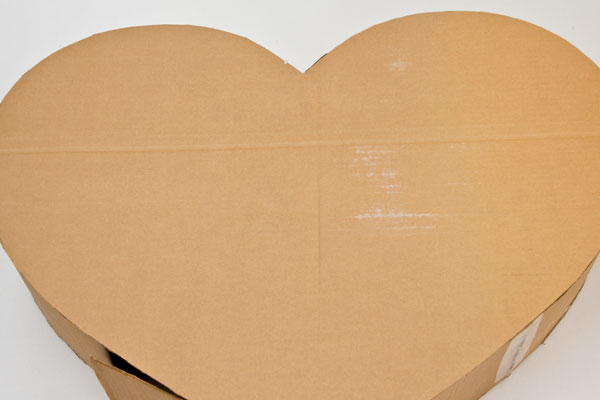
You’ll need to cut your cardboard into two large hearts and two or three 7″ wide strips, depending on the size of your box. My piñata was 30″ at it’s widest point and about 24″ at it’s tallest. In order to allow your strips to shape around the heart, you’ll need to bend them. Do this by simply holding the strips with both hands and bending the cardboard slightly all the way down the strip.
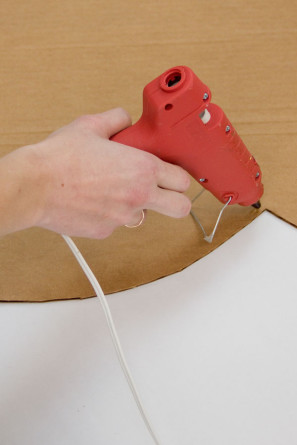
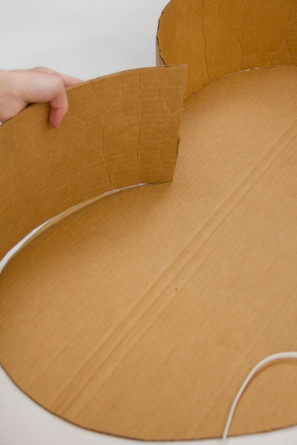
Break out the hot glue gun and glue your strips to one of the hearts in small sections (so the hot glue doesn’t dry). Start at the top of your heart. Each time a strip ends, just glue or tape another one to it and continue along the edge of the heart.
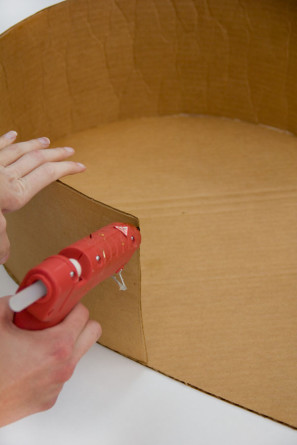
You will want to leave about a 6″ flap, not glued, on one side of your heart so you can fill the piñata! Working quickly, run a line of hot glue around the entire top of your now-glued strips (not including the flap) and quickly place the other heart on top.
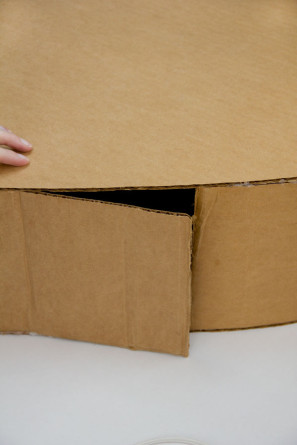
Your final heart base should look like this!
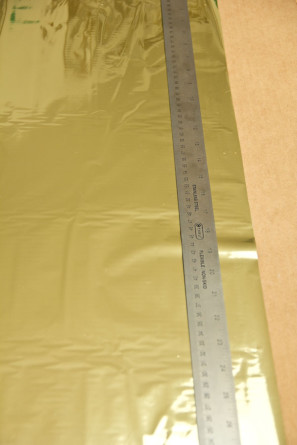
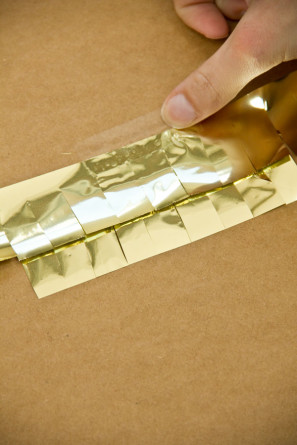
Now for the most tedious part. You’re going to cut about 85 1.5″ strips from your gold mylar. I found it easiest to do this by rolling out the mylar on a large cutting mat or piece of scrap cardboard and marking off several strips at a time (at the top and bottom) then using a long ruler and x-acto knife to cut each strip.
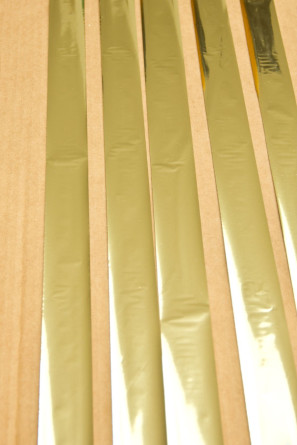
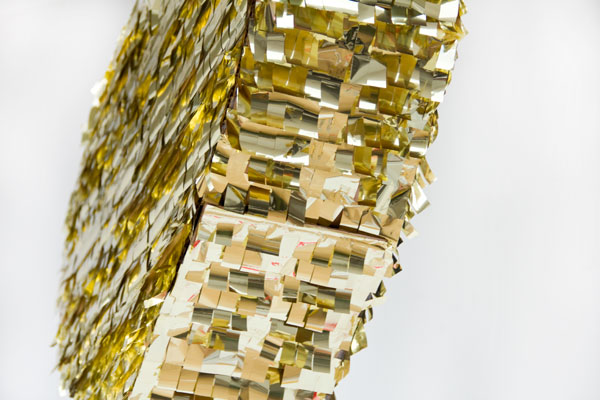
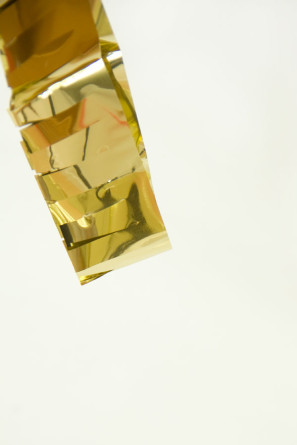
One by one, fold each strip in half three times and carefully fringe it with your scissors. This is not the easiest job in the world as mylar is slippery but you’ll get the hang of it after a strip or two! Promise!

Starting at the bottom of your heart, tape strips of the mylar, cutting each to the appropriate length. You don’t need to run pieces of tape the entire length of each strip, just use several smaller pieces across each one. Keep taping strips until you reach the top of the heart. As you can see below, it is ok (encouraged!) to extend the strips slightly off the heart so that all the cardboard is covered in the end. Repeat this with the other side.
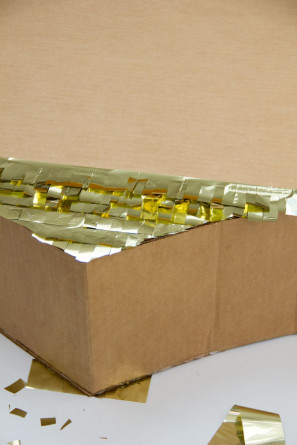
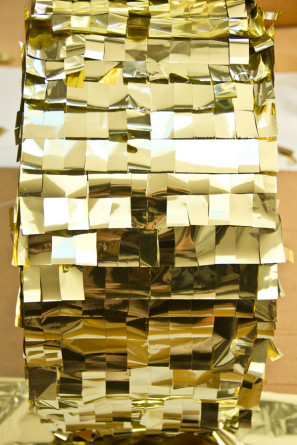
Now cover the sides using the same technique. Starting at the bottom point of the heart and working your way up to the top, then beginning again on the other side of the bottom point and working your way up. Once the entire thing is covered in fringe, poke a hole in the center at the top of the piñata are run a loop of string (or your hanging device of choice) through it. You can reach inside through your flap and tie a knot in the end to secure.

Fill up your piñata and get to partying! Or really, if it’s just too pretty to smash, hang it up and stare it at. Not that I’ve been doing that or anything…
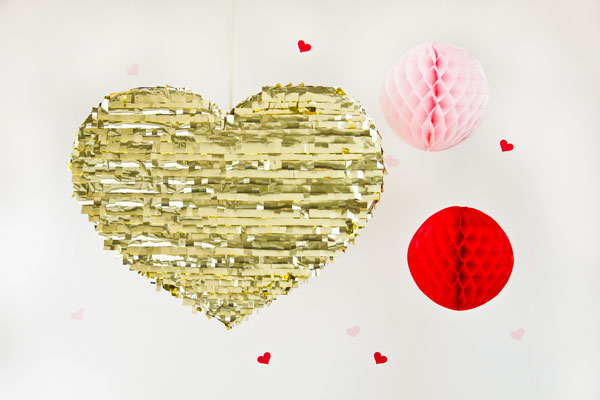
All Above Photos by Studio DIY
BONUS! I created this super huge piñata for something extra special, a fun Valentine’s Day shoot with Mary Costa Photography and Garlic, My Soul! Here’s a sneak peek of the piñata in action and you’ll get to see the whole shebang on Valentine’s Day!


Above Photos by Mary Costa Photography
Looking for more heart filled DIYs? How about heart streamers and conversation heart balloons!? Check out the full project gallery here!


")


icing designs says
maybe our favorite valentine’s DIY yet!! LOVE it!!
Hester says
Yessss love it! Hopefully I find the time to make this 😀
Fara says
Hi! I will love to share this spectacular DIY with my readers. Can I grab some photos (I will properly give you credit, with your post link and everything) ? Let me know and thanks in advance. Have an amazing day.
cariños,
Fara
Kelly says
Hi Fara!
I’d love for you to share this DIY with your readers! Feel free to grab a photo or two and link back here for the full tutorial!
Thanks!!
Kelly
Fara says
Thanks so much! This tutorial is awesome! I will let you know when I post it!
cariños,
Fara
Fara says
Hi Kelly! Your beautiful Piñata was featured in my blog last Friday. My blog is in Spanish, but here is a quick translation.
“February is here! Are you ready for Valentine’s day? Today we show you a great craft to make for Valentine’s Day a Heart Shaped Piñata. The problem is that is to cute to break! I could make it just to decor or to look at it. Don’t you think is gorgeous?
If you want to learn how to make it, click here (post link) to see the great step by step tutorial that Kelly from Studio DIY (blog link) prepare. Happy Crafting Day!”
This is the link! Thanks so much for sharing this amazing piñata and for sharing some photos with me!
http://www.littlethingscreations.blogspot.com/2013/02/dia-creativo-manualidad-pinata-en-forma.html
cariños,
Fara
Brittni says
Kelly – This project is amazing. I have been waiting to see when you would post this tutorial and now that it’s up, I love it even more. So good! P.S. The shoot with Mary is gorgeous.
Tiffanie says
KELLY! This is THE best thing I’ve seen on StudioDIY! It is GORGEOUS! I saw the other project you used this in for the photos and I was so distracted by it and wondered “why isn’t she mentioning that CRAZY AWESOME gold piñata! Amazing. I wish I had made this! After I’m done recovering from ALT (and nice little flu I caught) I’m starting a big installation piece with the egg piñatas here in S.F., will keep you posted about it! xo
Kelly says
Tiffanie! I came home with the flu too! =( Feel better! So glad you love this, I think it’s one of my faves too. I cannot WAIT to see this piñata installation you speak of!!
Kelly
Lexy | The Proper Pinwheel says
My favorite forever!!!! Such pretty photos! You rocked this DIY, my friend. 🙂
Melissa // thefauxmartha says
You are a craft genius!
Kat Roberts says
I am obsessed with this thing! Can’t wait to give it a try. There can never be enough shiny gold things in my life. Even better when they’re giant and shaped like a heart.
LARY@ Inspiration Nook says
How awesome! Can’t wait to see the whole shoot.
Rachel says
This is fantastic! I would not want to hit this with a bat, no matter how much candy was inside 🙂
jenn says
so so pretty! i love the heart shape so much! it would be so pretty hung up in a nursery or a craft room.
i made something similar but i used wrapping paper & tissue paper, and attached it with mod podge & a paintbrush. http://jennrocket.blogspot.com/2013/01/diy-gold-geometric-diamond-tissue-paper.html
Just Jaime says
Looks amazing!! Great job, I love how huge it is!
Found you via craftgawker
lyndsay // coco cake land says
Questions for you:
1. how are such a GLITTERY AMAZING BONKERS WICKED craft DIY genius???
2. how did i miss this beautiful post?? so happy i saw it now. LOVE!
xo
Sunshine Magazine says
Hi! We would love to feature this tutorial in issue number three of Sunshine Magazine. We will link all photos and ideas back here. Is that ok?
Shani says
This is beautiful! But I have a question: did you end up bashing this piñata? I ask as I am concerned as to whether or not just a cardboard layer with hot glue will be strong enough for a beating from kids (or adults!)? Thanks!
Kelly says
Hi Shani! I did not smash this piñata, actually! But, how well the cardboard holds up depends on the type of cardboard you use, and how well you secure it. Of course, the stronger the cardboard, the better. And the more adhesive, the better. The hot glue should hold up great (eventually you do want it to bust open, of course!) but you can add additional strips of tape all along the seam to make it extra, super secure!
Hope that helps!
Kelly
joo says
thank you! i love it !!
sarah smith says
This is the cutest! I’m going to make one as a card box for my wedding. Did you use just one roll of the mylar? If you do 1.5″ strips x 85, you’d need a little over one roll. Unless you can skimp and get by with just one?
oxofiles says
<a href=”https://oxofiles.com/driver-booster-review/”> Wonderful!</a>
oxofiles says
<a href=”https://oxofiles.com/kali-linux-virtualbox/”>Nice Post!</a>
supersoftonic says
<a href=”https://supersoftonic.com/iobit-malware-fighter-2020/”>Nice Post!</a>
oxofiles says
<a href=”https://oxofiles.com/tableplus-download/”>Appreciated…</a>
supersoftonic says
<a href=”https://supersoftonic.com/mp3tag-download/”>My goodness, how impressive!</a>
oxofiles says
<a href=”https://oxofiles.com/soundflower-for-windows/”>Thank you for getting right to work.</a>
supersoftonic says
<a href=”https://supersoftonic.com/ipadian-2020/”>Successful effort!</a>
oneksales says
<a href=”https://oneksales.com/clothing/under-armour-boys-jacket/”>Good work/Good job!</a>
onektech says
<a href=”https://onektech.com/tool/secured-pdf-unlock/”>Favorable!</a>
cggeyiiounb says
<a href=”https://onektech.com/tool/english-to-japanese/”>You should be so proud of yourself.!</a>
ywduobtj says
<a href=”https://oneksales.com/automotive/torq-foam-blaster-6/”>You’re amazing!</a>
dvfownybrn says
<a href=”https://oxofiles.com/transmission-mac-download/”>You’re an incredible friend.</a>
Zara says
<a href=”https://zzpboekhoudhulp.nl/boekhouder-breda/”>Excellent Work</a>
Claire says
<a href=”https://zzpboekhoudhulp.nl/boekhouder-arnhem/”>Perfect content <3</a>