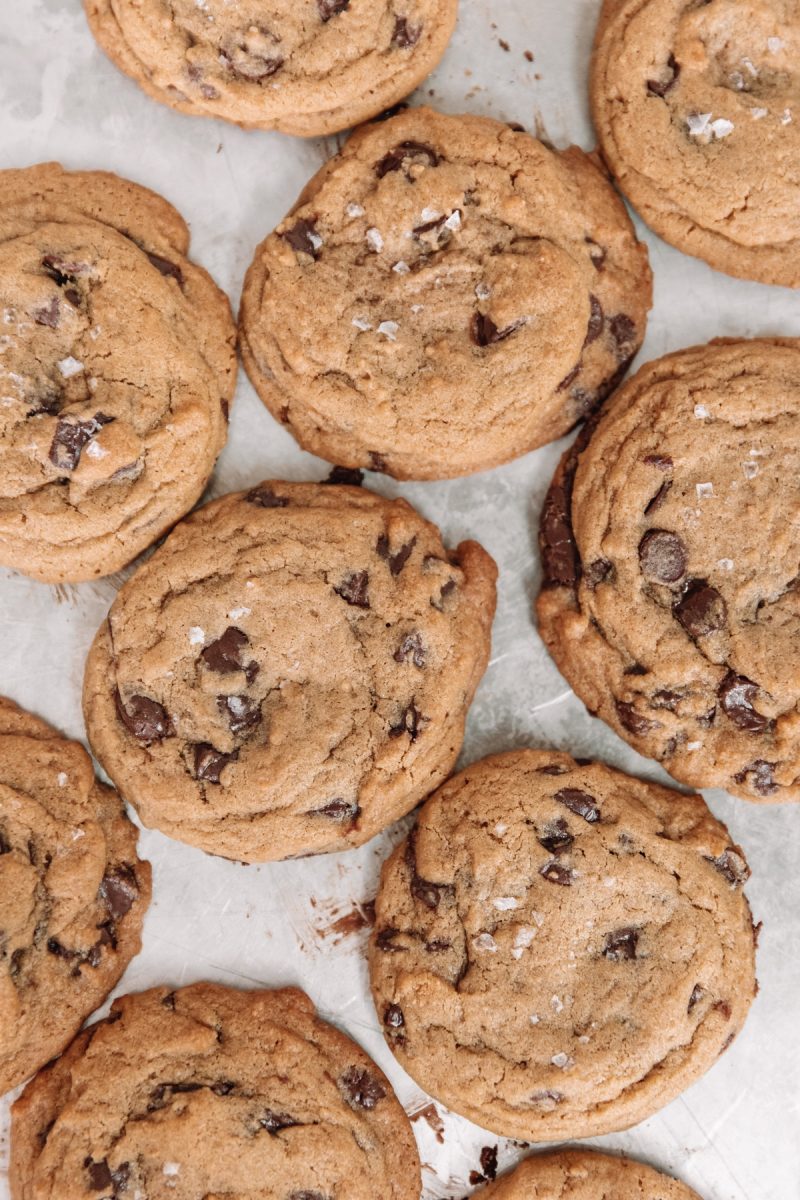
Oh boy, do I have a tasty treat for you all today! Anyone out there in major holiday baking mode? Yep, me too, and you’re going to want to add these beauties to your list. Stacy Able is not only a fantastic photographer, but she has quite the passion for macaron-making on the side! After seeing her tweet far too many of these delicious looking French creations, I had to ask her to share a recipe with you all and voila! These yummy sweets are not your basic cookie so Stacy is here to walk you through each and every step and soon these peppermint macarons will be stealing the spotlight on your cookie trays!

Stacy Able Photography’s
Peppermint Vanilla Bean Macaron Recipe
Ingredients
200g almond flour
200g powdered sugar
80g egg whites
80g egg whites
200g regular sugar
80 ml water
1 vanilla bean pod, seeds scraped out
2-3 drops of peppermint extract
Red food coloring (optional)
Crushed Candy Canes (optional, for finishing)
Directions
Heat oven to 355F
Separate egg whites ensuring there is absolutely no egg yolk. You may set the egg whites aside for 2-3 days in a refrigerator to “age”.
Measure out egg whites into two small containers with 80g in each.


Measure out almond flour and powdered sugar; add to food processer or spice grinder and pulse. Once the sugar and almond flour is a fine texture, sift 2 times; add
the vanilla seed scrapings, peppermint extract, and 80g of egg white, set aside.


Cook sugar with water in a pot over medium heat with candy thermometer. Gently swirl the water and sugar a few times so it cooks evenly. When the temperature reaches 230F take the pot off the oven.
While sugar is cooking, Begin whipping the other 80g of egg whites with stand or hand held mixer. When eggs are in a soft peak drizzle the 230F hot sugar syrup down the bowl in a thin stream and continue beating until you get a firm, shiny meringue.


Pour half of the almond/powered sugar ingredients into meringue and stir ensuring you scrape the sides and bottom. Add the second half and stir. Note: do not over stir. You want the batter to look like a thick magma that when dropped in the bowl slowly absorbs into batter. Over stirring creates flat, pancake, cracked cookies.
Place parchment on a cookie sheet and trace 1 inch circles on the parchment then flip the parchment as you do not want pen marks on the cookie.


In a pastry bag use a plain round tip and pipe out circles on your parchment. You can create swirled color by adding a few drops down the side of the pastry bag or a solid color by adding a few drops of color while mixing the egg white/almond/sugar ingredients. Once you have your circles piped, firmly hold the cookie sheet and rap the sheet against a counter a couple times. This is done to help form the foot/pied bottom of the macaron.

Let the dough sit for 15-30 minutes to form a soft non sticky shell.
Place in oven for 11 minutes and put a wooden spoon or chopstick in the door to let some heat escape. Note- this will produce a slightly chewy Macaron which is traditional without browning the cookie. If you’d like them done slightly more you can cook at 300 for 20-25 minutes.
Once cookies are done, pull them out of the oven and let them cool. Do not remove from parchment until cool as they may stick. Pull up the corner and gently peel from the Macaron or use a metal spatula to gently remove shells.
To complete the cookie, make a simple butter cream and add a few drops of flavoring. For this recipe, we used a few drops of peppermint extract. Spoon icing onto macaron shell and gently press the two sides together.

Roll the cookie into crushed candy canes.


Macaron shells will last 3-4 days if left on the counter. If unfilled you can freeze the cookies then thaw and fill for an instant glamorous treat.


All Photos by Stacy Able Photography
If you need me, I’ll be in the kitchen baking up a batch of these! A special thank you to Stacy for sharing this great tutorial (and making us all hungry!)!


Rebecca - A Daily Something says
Oh my word, she makes macaron-making an exact science and I LOVE it. Reminds me of chemistry! These are gorgeous pictures, too…
Vy says
beautiful macarons!
A Bowl Of Mush says
These macarons look so pretty and festive!
Amanda says
these are absolutely stunning, and your photos really do them justice!
Amanda says
What a brilliant recipe and amazing step by step instructions! I must admit, I have always been a little scared of making macarons, but with your wonderful step by step guide I think I might actually give it a go! Thanks for sharing.
Cathy @ Savory Notes says
These look precious, a great treat for the holidays 🙂 I’ve had my ups and downs with macarons… I should give them another try.
Mai says
I Love Peppermint Flavor Candy…and peppermint Macarons are awesome!!! and beautifully done….i’m so eager to try it now….even though were not in the holiday already…lol…but still this will be an awesome treat!!! Way to go!!!
Mai says
Sorry I meant to say ‘were not in the holiday seasons anymore’ sorry there was a typo..; )
Sara says
Ok, am reading the instructions but can u provide details regarding the ‘ When the temperature reaches 230F take the pot off the oven.’ what pot is this and when is it placed on the oven?
Kelly says
Hi Sara! By oven, Stacey meant “stovetop.” You cook the water and sugar together on the stove and remove it from the heat once it hits 230F. Hope that helps!
Kelly
Jennifer says
Lovely photos and great detailed instructions! Can you tell me how many cookies this recipe makes ( two macaroons with icing in between)? I think I am going to try it for a cookie swap party and so I would like to figure out if it an option based on the quantity of the recipe. Thanks!
Kelly says
Hi Jennifer!
How fun! Unfortunately these really depend on the size that you make your circles. It’ll make at least 24 filled sandwiches but can make up to 40 bite-sized ones if you pipe smaller circles. I hope that helps!
Kelly
chelle abungan says
i love macaroon and peppermint -coincidence, <3 i'll gonna try it soon.
chelle abungan says
love this, i’ll gonna try the recipe soon
Adonis says
How do you make th peppermint buttercream?
Kelly says
Hi! To make the buttercream, you can use any simple buttercream recipe (like this one: http://www.foodnetwork.com/recipes/gale-gand/quick-vanilla-buttercream-frosting-recipe/index.html) and just add a few drops of peppermint extract!
Hope that helps!
Kelly
Becky says
Hi I just tried making this, but when I poured the hot sugar into the stand mixer with the egg whites, it turned into a liquid. It was more like a pour batter than the stiff peaks that were supposed to form. I’ve never made macarons with heated sugar, do you think I’d get good results if I just added the sugar at room temperature? If not, please help me figure out what went wrong! I’d love to successfully make these for my cookie party this Sunday! Thank you
Stacy Able says
Hi Becky,
Macaron are tricky cookies and even the best macaron maker has some batches that blow up. In your case, did you slowly drizzle in the hot sugar into the already frothy whipped egg whites…? If you poured it in at once I can see how it may turn into a liquid. The reason you slowly drizzle the hot sugar in as it doesn’t cook the eggs immediately. Another potential problem could have been a tiny bit of egg yellow was in the mix. Anytime fat is introduced in making a egg meringue will cause a batter to be liquid. One trick for egg whites is to separate and leave them for a day to thicken slightly. Also a 1/8 teaspoon of cream of tarter while mixing the egg whites pre adding the sugar will help stabilize the egg whites. This trick is particularly helpful on humid days. Hope that helps!
joe DeFabis says
My wife tried the peppermint macarons – AWESOME!
Kristen says
Great recipe! Generally easy to follow. I had a few issues along the way… I stirred the sugar while it was cooking and it turned to hardened sugar before it reached the temp. Started over and it was fine. Also, they ended up a little bumpy and grainy. I am not sure what happened… one guess, I was not sure if I was supposed to mix up the dry ingredients with the first egg. I did and I think that made it hard to mix completely. The other possibility is that is that I pours the sugar too fast and curdled some of the egg. So, not pretty or smooth, but tasty!
Kristen says
Hi there! These look great, but I was hoping to get some clarification. Why is the entire volume of egg whites not mixed together? Do you mix the egg whites/powdered sugar/almond flour mixture together before mixing in with the stiff egg whites? Or do you just pour it all without combining thoroughly first? Thanks!
Joe DeFabis says
Very informative, thank you
http://www.mirrorphotoboothindianapolis.com